Tips and 3 Apps for Taking Better Bird Photographs

Beauty and lovely animals often attract us when we are in nature. We look out, see forests and distant skies, and find beautiful birds hovering. The difference is that birds have their ideas and habits and are not always in one place. That's why taking good bird pictures tests your shooting skills and ability to get along with birds. This article will provide some bird photography tips to optimize your shooting process and post-processing.
Quick Summary of Bird Photography Tips:
- Photographer
The photographer surveys the site in advance and learns about the species and habits of the birds you want to photograph. We must learn to use some composition methods and make the photo show the best visual effect possible.
2. Equipment
We need to test our camera in advance, including lenses and tripods. There are also our Technical Settings, including aperture, shutter speed, and focal length.
3. Birds
We need to make the bird as relaxed as possible and think we are not hostile to get more natural photos.

Quick Summary of Birds Photo Post-processing Apps
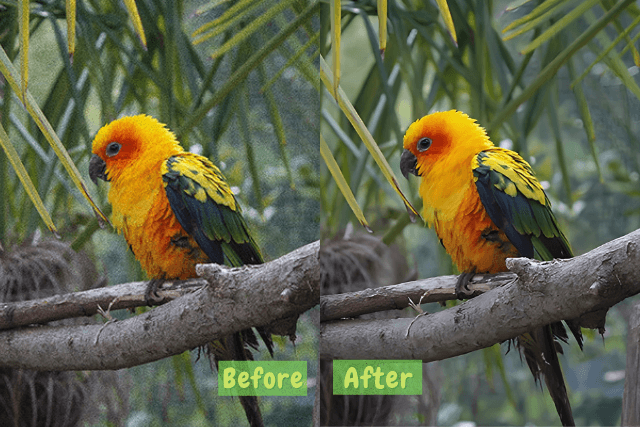
- Imglarger removes noise from your pictures and enhances the quality of your bird photos with fuller colors to enhance the visual effect of your photos. The main thing is that the process is straightforward, with just a few clicks. Imglarger solves this problem brilliantly and improves efficiency.
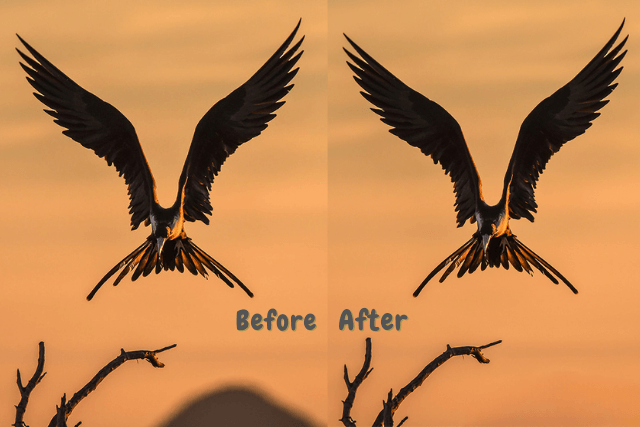
- BgeraserMagic eraser is an intelligent eraser supported by the latest AI algorithm. It can cleverly calculate and then repair the background colour of the erased object, and the result is a picture that leaves no trace of erasure, almost without any breakage.
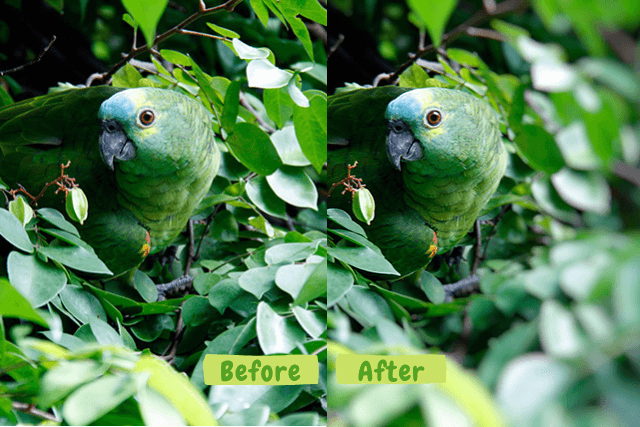
- Fotoris a powerful image editor. Fotor's blurred background feature uses image processing techniques to produce beautiful blurred effects. It gives the image a strong visual impact and highlights the subject better.
Tips for Taking Better Birds Photographs
- Tip 1: Scouting the site ahead of time
We need to look at the weather, arrive early, and find a few locations that will give us great results. Improve our shooting efficiency and ensure a good experience.
- Tip 2: Learn about the birds' habits
Most birds have the habit of waking up early to feed, so we can get up early to meet them. We need to know where they like to stay to increase our chances of meeting them.
- Tip 3: Use our photography skills wisely
We pay attention to how we compose our shots because birds are uncontrollable. Use our photography knowledge to compose smartly and use light and shadow to create stunning visual effects.
- Tip 4: Debug your equipment
- Select a camera with a good frame rate that is suitable for taking pictures of birds. A good autofocus function is also an important factor in our choice of camera.
- The lens will affect the speed and accuracy of the autofocus. A single lens will limit its effectiveness, so we need several different or multifunction lenses. Whether a zoom lens or a fixed-focus lens, all play an important role in each.
- If you use a long lens, consider a tripod and head. The head can make the lens more stable when moving. Tripods not only play a supporting role in improving the comfort of use but also improve the quality of the picture. It is worth noting that you need to check them several times before shooting and make sure they are solid enough.
- Tip 5: Reducing irritants
We need to reduce the shutter speed and sound, to prevent birds from flying away when shooting. We try to wear clothes similar to the color of the surrounding environment, remember to put away the clothes fluttering belt, and so on to avoid the wind blowing to make a loud noise.
- Tip 6: Remove the bird's defenses
Don't look at or stare at the birds so they don't mistake us for predators. Whenever possible, we put our heads behind the camera and tripod to hide our faces and make us appear smaller.
You can walk to the bird in wide zigzags or at an angle, gradually bringing you closer. It gives the impression you are moving alongside.
Post-processing for Bird Photography
#1 Remove Noise from Bird Photos - Imglarger
When a bird is flying or moving, the image will have digital noise that damages the color and clarity of the image. We can solve this problem by reducing the noise, fixing the picture color, and improving bird photo quality.
When we mention noise reduction, the first thing that comes to mind is the image editing tool. We select the noise reduction from various functions and adjust the parameters to operate. These tools, such as Ps, require us to have some experience in image editing. Traditional Image editors can solve the problem, but the steps can be complicated. Happily, AI can help us to simplify this series of operations. There are many AI noise reducers, and imglarger's denoise is considered one of the most outstanding tools. Let's use Imglarger as a representative example.
How to Use:
- Step 1: Click "upload" or drag and drop the image to upload.
- You can choose to edit or start noise reduction.
- Step 3: If you choose Edit, you can adjust the basic parameters and click the yellow "Done" button in the upper right corner to start noise reduction.
- Step 4: Finish the process, and click "Download" to check and save the result.

#2 Cut out the Unwanted Items in the Photo - Bgeraser
There is a lot of uncertainty when taking pictures of birds. When we isolate the bird, we want to photograph, other fellow birds may intrude, or other distracting objects, such as tree branches, may be photographed.
After erasing the interfering object from the picture is an EXCELLENT picture. How do we erase unwanted objects? There are several methods for you. If you are a professional image processor, then the traditional image editor you are more proficient in using and won't have to spend a long time learning. For inexperienced people, smart erasers are a good choice. Most smart erasers are simple functions by going to the page and uploading.Let's take the most popular AI eraser, Bgeraser, as an example and see how it works!
How to Use:
- Step 1: Upload the image you need to process.
- Step 2: After uploading successfully, enter the operation panel. You can adjust the brush size and intensity according to the object's size.
- Step 3: We use the brush to erase the object covered and click "erase".
- Step 4: The process only takes five seconds, then click "Download" to check and save the picture.

#3 Blur the Background to Highlight the Object - Fotor
The background is also important to our ability to take better bird pictures. Whether we shoot birds in a simple color or various colors, too much color in the background will not bring out the subject. So we try to choose the right background when shooting, but it depends on whether the bird cooperates. Of course, Fotor can solve this problem in post-processing, where we can defocus the background to weaken it and highlight the subject. It is more efficient to operate online than to download software. We choose an online photo editor that will be more convenient. Fotor's blur background can effectively solve the problem.
How to Use:
- Step 1: Click "Open image" to upload your image.
- Step 2: Click on the outer circle points to adjust the area to be HD.
- Step 3: Click on the center of the circle to move the area.
- Step 4: Select "Download" to save.

Conclusion
Taking photos of birds is also a process of getting along with nature. This process can accumulate our shooting experience while exploring birds' habits and feeling nature's greatness and wonder.
We must consider many factors if we want to take good pictures of birds. Before shooting, we have to prepare to survey the terrain and adjust the equipment, as well as shooting skills to relax the birds. Post-processing is also an important part. When we encounter the need for noise reduction, removal of unwanted objects, and blurred backgrounds, we can use the three tools mentioned in the article to easily solve the problem and get a photo that satisfies us. Our photos of birds are our understanding of nature and the beauty we find in our eyes.